“It’s also a financial blackhole.”
My homelab represents far more than a collection of servers and networking equipment; it embodies a deliberate journey of technical exploration and professional growth. What began as a curiosity-driven endeavor to understand enterprise infrastructure has evolved into a comprehensive digital ecosystem that serves as both a learning laboratory and a production-ready platform for various services that enhance my daily workflow.
My Homelab Journey : More Than Just Wires and Code
For me, the construction and evolution of my homelab transcend mere technical components; it represents a dynamic digital playground and a cornerstone of my professional growth. The initial spark for this venture often stemmed from a deep-seated curiosity for how things operate, akin to my early fascination with disassembling electronics to understand their inner workings. This foundational curiosity established an authentic, relatable connection with my journey, inviting you into a narrative driven by my genuine enthusiasm rather than a dry technical exposition.
I view this journey of building my homelab as a personal “hero’s journey” for my technical development. I embarked from a familiar starting point, confronted complex technical challenges, and ultimately emerged with significantly enhanced skills, expanded knowledge, and a tangible, functional system. This blog is meant to elevate my homelab experience from a simple technical description into a record of my personal and professional evolution, making it inherently more engaging. I position myself not merely as a technician, but as an explorer, a persistent problem-solver, and a dedicated lifelong learner. Furthermore, my underlying motivation often extends beyond structured learning or career advancement, encompassing the intrinsic value of “play” in technical skill development.
My homelab functions as a dedicated space for experimentation and “messing around” with technology. This emphasis on the enjoyment I derive from exploration and hands-on experimentation highlights my proactive, self-motivated learning style, which I believe holds immense importance. This signals my deep-seated curiosity and a sustained drive for innovation, transforming my homelab from a simple resume entry into a testament to my genuine passion.
Chapter 1: The Genesis of My Digital Playground – Problem & Purpose
The Spark: Igniting My Homelab Vision
For me, the inception of my homelab often originated from a specific technical challenge or a burning curiosity that demanded a hands-on environment for resolution. This could have been a problem I encountered in a professional setting that required deeper experimentation, a desire to self-host critical services for enhanced data privacy and control, or an eagerness to delve into emerging technologies like Kubernetes or advanced virtualization that I couldn’t adequately explore in a production environment.
By framing my initial motivation as a problem my homelab was built to solve, I aim to capture your attention right from the start. This approach creates a compelling narrative arc; shifting the focus from just listing components to showcasing strategic thinking and design. This problem-solution narrative is a powerful tool in technical communication.
Defining My Digital Domain: Goals and Objectives
The development of my homelab is guided by a set of clear, measurable objectives that dictate its design and evolution. These goals reflect my intentionality and a strategic approach to skill acquisition. Key objectives often include:
-
Learning Purpose: A primary driver for me is often to gain in-depth knowledge of specific technologies, such as Kubernetes, Docker, virtualization platforms like Proxmox, various operating systems, CI/CD tools, or observability stacks like OpenTelemetry.
-
Data Privacy and Control: A high priority for me as a homelab enthusiast is to ensure my personal data remains local and under my direct control, reducing my reliance on third-party cloud services.
-
Cost-Effectiveness: Building my homelab serves as a strategy for me to reduce the recurring expenses associated with public cloud services for my personal projects or learning environments.
-
Specific Services: Hosting practical applications like media servers (Plex), network-wide ad-blockers, home automation platforms (Home Assistant), or game servers exemplifies the tangible utility of my homelab.
-
Scalability and Flexibility: I design my system to accommodate future growth and new workloads without requiring complete overhauls.
-
Robustness and Reliability: I incorporate redundancy and fault tolerance to minimize downtime, which is a crucial goal for maintaining service availability.
Initial Vision vs. Reality : My First Hurdles
The journey of building my homelab rarely followed a perfectly linear path. Often, my initial, optimistic vision encountered practical realities and unexpected complexities, setting the stage for a compelling narrative that mirrors a “mountain” storytelling structure, illustrating a series of challenges and rising action. Early hardware limitations, such as insufficient RAM or CPU power, might have necessitated compromises, or unexpected software complexities could have forced a pivot in my approach.
It is a well-understood principle in technical endeavors that “the first attempt to solve a problem rarely succeeds.” For me, framing these early challenges as an integral and valuable part of my learning process adds authenticity to the narrative and demonstrates my resilience. Detailing my initial failures, unexpected issues, or significant architectural pivots, such as transitioning from a complex Kubernetes setup to a simpler Docker approach due to “headaches” and a desire to “reduce complexity,” highlights my mature engineering mindset.
Chapter 2: The Architecture : Building Blocks of My Digital Realm
My Network Architecture and Topology : The Digital Backbone
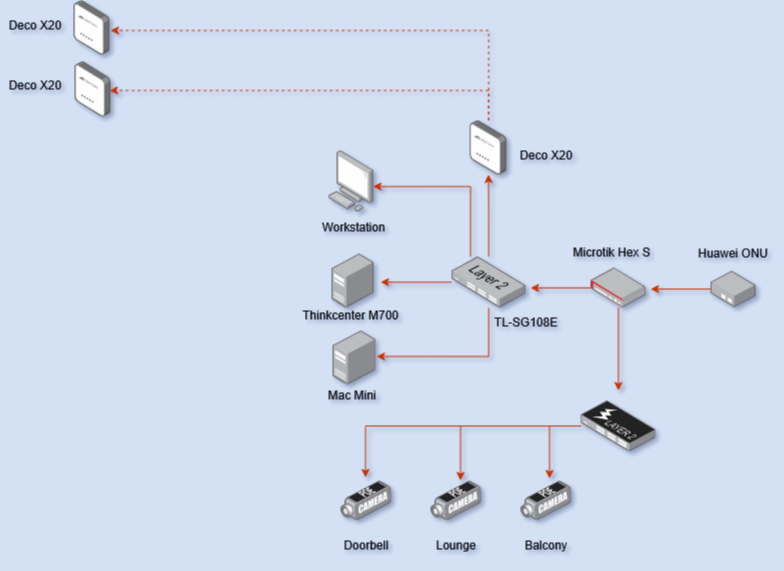
My homelab’s network foundation begins with a symmetric 400 Mbps FTTH connection from my ISP, terminating at an ONU (Optical Network Unit). This high-bandwidth connection ensures adequate throughput for all my services, including media streaming, remote access, and experimental workloads.
The core routing is handled by my MikroTik RouterOS Hex. I chose this router for its prosumer features, routing capabilities, and scripting functionality. It provides robust firewall rules, VLAN segmentation capabilities, and detailed traffic monitoring that’s essential for my security-conscious homelab environment.
For wireless coverage throughout my house, I’ve deployed a TP-Link Deco X20 mesh system consisting of three nodes strategically positioned to ensure seamless roaming and optimal coverage. This Wi-Fi 6 mesh system provides the reliability I need for my IoT devices, mobile clients, and wireless experimentation.
My wired infrastructure centers around a TP-Link TL-SG108E managed switch connected to the main Deco node. This 8-port gigabit switch with VLAN support connects all my critical infrastructure components, including my main server, Mac Mini, desktop workstation, and Raspberry Pi cluster.
My Network Layout
My Core Infrastructure Components : The Powerhouses
Primary Server: Lenovo ThinkCentre M700
The backbone of my homelab is a Lenovo ThinkCentre M700 with an Intel i3-6100T processor running Ubuntu Server. I deliberately chose Ubuntu Server over a hypervisor like Proxmox for several strategic reasons:
-
Simplified Troubleshooting: Direct access to the underlying Linux system allows me for faster diagnosis and resolution of issues. When something goes wrong, I want to be able to dive straight into the OS without an extra layer of abstraction.
-
Resource Efficiency: No hypervisor overhead means more resources are available for my containerized services. I wanted to squeeze every bit of performance out of this machine for my Docker workloads.
-
Familiar Environment: I have deep Linux knowledge, which enables me to rapidly deploy and maintain services. It’s my comfort zone for getting things done efficiently.
This server hosts all my services through Docker containers, providing isolation, portability, and easy management through docker-compose configurations. This approach offers me the benefits of virtualization while maintaining the simplicity and performance of bare-metal deployment.
Virtualization Lab: Mac Mini with Proxmox
For virtualization experiments and isolated testing environments, I run Proxmox VE on a Mac Mini with a i7-3615QM. This setup provides me with a dedicated hypervisor environment for:
-
Kali Linux VMs: For penetration testing and security research, I need a dedicated, isolated space.
-
Arch Linux Instances: I use these for bleeding-edge software testing and to keep my skills sharp with a rolling-release distribution.
-
Alpine Linux Containers: These are perfect for minimal, security-focused deployments and learning about lightweight containerization.
-
Windows VMs: For cross-platform compatibility testing and specific software that requires a Windows environment.
-
macOS Instances: Crucial for my development workflow testing and ensuring compatibility across Apple’s ecosystem.
-
Home Assistant OS: This is where I manage my home automation and IoT devices in a dedicated, robust environment.
This separation ensures that my experimental workloads don’t impact my production services and primary home network while providing me with a live prototyping enviroment.
Raspberry Pi Cluster: My Security Research Platform
My Raspberry Pi cluster serves as a dedicated platform for cybersecurity experimentation, specifically focused on honeypot deployment and threat research. This cluster allows me for:
-
Distributed Honeypot Networks: I use this to attract and analyze malicious traffic in a controlled, distributed manner.
-
Network Security Monitoring and Intrusion Detection Testing: It’s my sandbox for testing various security tools and techniques.
-
IoT Security Research: I explore vulnerabilities and best practices in a controlled environment, crucial for understanding the expanding attack surface of connected devices.
-
Kubernetes Experimentation: It’s a cost-effective way for me to learn and experiment with container orchestration at a smaller scale.
My Storage Architecture : Data Redundancy and Performance
My media storage is implemented using a RAID 1 configuration, providing redundancy for critical data while maintaining read performance. This setup ensures that my media files remain accessible even in the event of a single drive failure, which is crucial for a media server that my family members depend on daily.
I chose the RAID 1 configuration over other RAID levels because of its:
-
Simplicity: It’s easy for me to understand and maintain.
-
Reliability: It offers true redundancy with instant failover, giving me peace of mind.
-
Performance: It provides excellent read performance, which is ideal for streaming media.
-
Cost-effectiveness: It requires only two drives for full redundancy, making it an efficient choice for my needs.
Chapter 3: My Service Portfolio and Container Architecture : The Digital Engine
These services cover everything from media management and network utilities to monitoring and productivity tools. Each is deployed using Docker with meticulously configured resource limits, networking, and persistent storage volumes.
My Container Management Strategy is built on:
-
docker-compose: All my services are defined indocker-composefiles. This allows me to easily spin up, tear down, and manage my applications in a reproducible and consistent manner. -
Persistent Data Volumes: My critical data is safeguarded by mapping persistent data volumes to dedicated storage locations, ensuring that my information remains intact even if containers are rebuilt or updated.
-
Custom Docker Networks: I implement network isolation through custom Docker networks, enhancing security and preventing unintended communication between services.
-
Automated Backup Strategies: For critical service data, I have automated backup strategies in place, ensuring my valuable information is always protected against unforeseen events.
-
Health Checks and Restart Policies: Services are configured with robust health checks and restart policies for high availability, meaning they are resilient and recover automatically from failures, minimizing downtime.
Here’s a detailed breakdown of the key services I’m running, and what problem each solves for me:
My Core Homelab Services : Solving My Everyday Needs
AdGuard
My homelab’s first line of defense is AdGuard, a foundational service for establishing a pristine and secure online environment. My core motivation for implementing AdGuard stems from a deep-seated commitment to digital privacy and an intolerance for intrusive advertising. How it works is quite clever: AdGuard functions as a DNS sinkhole, intercepting and blocking DNS requests for known ad, tracker, and malware domains at the network level. This proactive approach ensures that unwanted content and data collection attempts are thwarted before they even reach any device on my network, from workstations to IoT devices. The tangible benefits are a significantly cleaner Browse experience, reduced bandwidth consumption, and a robust layer of network-wide privacy protection. It’s an essential component for maintaining digital hygiene and sovereignty.
Beszel
Beszel serves as the dedicated monitoring and observability core of my homelab infrastructure. My rationale for its deployment is rooted in the necessity for real-time insights into system health and performance, enabling proactive issue resolution. This powerful tool excels at collecting and visualizing critical system metrics. It’s configured to meticulously track vital data points like CPU temperature, ensuring my processors aren’t overheating and risking stability. I also rely on it to keep a vigilant eye on network usage across different interfaces, helping me pinpoint bandwidth hogs or potential connectivity issues. Furthermore, it monitors disk I/O, revealing if any storage drives are becoming bottlenecks. Beszel’s comprehensive dashboard provides the critical operational awareness required to maintain a highly reliable and optimized homelab environment, allowing me to intervene before minor issues escalate into major problems.
Excalidraw
For my personal and professional ideation, Excalidraw is a self-hosted staple, transforming how I brainstorm and communicate visual concepts. My decision to host it locally is driven by a non-negotiable requirement for data privacy and absolute control over my intellectual property. The beauty of this setup lies in its architecture: this instance of Excalidraw operates as a standalone web application hosted entirely on my server, ensuring that all diagram data is processed and stored exclusively within my private network. Unlike public cloud-based whiteboarding tools, no sensitive sketches or confidential project flows ever leave my controlled environment. This arrangement provides a secure, low-latency, and perpetually available canvas for engineering diagrams, system architectures, and collaborative ideation, all while maintaining absolute data integrity.
Filebrowser
Filebrowser is an elegant solution for unified, secure file access across my homelab, addressing the crucial need for convenient data management without compromising privacy. My choice reflects a profound desire to liberate my files from proprietary cloud storage solutions, regaining full ownership. The underlying mechanism is efficient: Filebrowser is a lightweight Go application that provides a web-based interface to navigate, manage, and share files directly from my server’s file system. I configure it to expose specific directories securely via HTTPS, offering capabilities like file uploads, downloads, and the generation of time-limited, password-protected share links. This architecture ensures that my critical documents and media are accessible from any device, anywhere, while remaining physically located and entirely controlled within my private infrastructure.
Glance
Glance stands as my central, customizable dashboard, providing an “at-a-glance” overview of both my homelab’s operational status and my aggregated digital interests. My motivation for utilizing Glance is to consolidate diverse information streams into a single, highly accessible interface, enhancing my overall situational awareness. Its power lies in its versatility: Glance leverages a flexible widget system that allows for embedding live server metrics, integrating various RSS feeds (for new YouTube uploads or specific news topics), and displaying data via direct API calls. This aggregation capability creates a truly personalized information hub, allowing me to monitor system performance, track industry news, and stay informed about my digital ecosystem, all from one intuitive display.
Home Assistant
At the core of my automated living space is Home Assistant, an indispensable platform reflecting my unwavering commitment to a smart home that prioritizes privacy and local control. My philosophy here is simple: automation should serve me, not a cloud provider. How it achieves this is crucial: Home Assistant functions as a powerful open-source home automation hub, communicating directly with smart devices using various local protocols (e.g., Zigbee, Z-Wave, MQTT, local APIs). All automation logic, sensor data processing, and state changes occur exclusively on my local server. This design choice fundamentally eliminates reliance on external cloud services, safeguarding sensitive personal data and ensuring instantaneous, reliable automation execution, even during internet outages. It’s the definitive solution for intelligent home management, offering unparalleled customization and data security.
IT-Tools
IT-Tools is an essential self-hosted utility suite, providing immediate access to a comprehensive collection of developer and network tools. My rationale for deploying it locally is rooted in a fundamental need for secure, offline-capable utilities that safeguard sensitive data. A key aspect of its operation: this web application primarily performs client-side processing for most of its functions. This means that any data I input (e.g., a JSON string to format) is processed directly in my web browser and never transmitted to a server. For any server-side functionalities, the processing occurs entirely on my homelab, effectively negating the need to transmit potentially confidential information to third-party online services. IT-Tools delivers a robust and privacy-conscious toolkit, significantly streamlining my development and troubleshooting workflows.
Jellyfin
Jellyfin is a core addition to my personal media streaming ecosystem, a robust and open-source alternative to commercial platforms. My decision to self-host is driven by a profound desire for complete ownership over my media library, eliminating subscription fees, content restrictions, and privacy concerns associated with third-party services. The way it works is highly efficient: Jellyfin operates as a media server that meticulously scans, organizes, and enriches my extensive collection of movies, TV shows, and music with rich metadata. It then intelligently transcodes content on-the-fly to ensure optimal streaming compatibility across a diverse range of client devices (web browsers, mobile apps, smart TVs), all while keeping the media files securely stored on my local server. This provides a customizable, high-fidelity, and privacy-respecting entertainment experience.
Kavita
For my extensive collection of digital comics and manga, Kavita serves as the definitive self-hosted reader and library management system. My motivation stems from the undeniable need for a dedicated, optimized platform that respects my privacy and provides a superior reading experience compared to generic file browsers or restrictive commercial applications. Its operational efficiency is clear: Kavita is a specialized comic/manga server capable of indexing various archive formats (CBR, CBZ, PDF) and providing a highly optimized web-based reader. It efficiently generates thumbnails, extracts relevant metadata, and offers features like reading progress tracking and content pre-caching. This ensures a fluid and visually appealing reading experience while maintaining strict control over my intellectual property within my private network.
Nginx
Nginx functions as the indispensable reverse proxy and web server at the perimeter of my homelab, centralizing and securing all external access to my internal services. My rationale for its deployment is multifaceted: enhanced security, streamlined certificate management, and efficient traffic routing. How it achieves this is fundamental: Nginx listens on public internet ports (e.g., 443 for HTTPS) and intelligently forwards incoming requests to the appropriate internal Docker containers or services running on different ports. A key feature is its SSL/TLS termination capability, decrypting encrypted traffic at the edge and often routing it internally over unencrypted channels for efficiency within the trusted network. This architecture secures my exposed services, simplifies certificate management, and provides a single, controlled entry point to my entire homelab infrastructure.
Plex
While I continue to explore open-source alternatives, Plex remains a significant component of my media serving strategy, valued for its broad client compatibility and polished user experience. My initial adoption of Plex was driven by its ability to effortlessly organize and stream my media collection across a wide array of devices, simplifying media consumption for family and friends. Its robust functionality is apparent: The Plex Media Server scans and categorizes my media files, automatically enriching them with metadata (cover art, synopses, ratings) from its extensive database. It then serves this content to a vast ecosystem of Plex client applications available on smart TVs, mobile devices, gaming consoles, and web browsers. Its powerful transcoding engine ensures smooth playback regardless of the client device’s capabilities, even leveraging some cloud services for remote access and metadata retrieval, which I manage carefully for privacy.
Portainer
Portainer is my indispensable graphical interface for managing and orchestrating my Docker containers, representing a critical tool for operational efficiency within my homelab. My choice is rooted in the desire to simplify complex Docker command-line operations, enhancing productivity and reducing administrative overhead. Its core strength lies in its interface: Portainer provides a comprehensive web-based GUI that interacts directly with the Docker API. This allows me to visually manage containers, images, volumes, networks, and even deploy entire Docker Compose stacks with intuitive clicks. It offers real-time monitoring of container status, access to logs, and simplified deployment workflows, effectively abstracting the underlying Docker commands and making container management highly accessible and efficient.
Stirling-PDF
Stirling-PDF is my self-hosted solution for comprehensive PDF manipulation, addressing the frequent need for secure document processing without resorting to external services. My motivation is rooted in the paramount importance of keeping sensitive document content private and under my control. Its operational design ensures privacy: Stirling-PDF is a web application that leverages powerful backend libraries to perform various PDF operations (e.g., merging, splitting, compressing, converting). All uploaded PDFs are processed locally on my server, and the resulting manipulated files are also generated and stored exclusively within my private network. This guarantees that confidential document data never transits or resides on third-party cloud servers, offering a secure and efficient environment for all my PDF-related tasks.
Suwayomi
For managing and reading online comics and webtoons, Suwayomi is my preferred self-hosted reader, streamlining my digital comic consumption. My choice is driven by the desire to centralize my online reading experience, avoiding fragmented interfaces and intrusive advertisements from various webcomic platforms. Its aggregation capabilities are key: Suwayomi functions by intelligently scraping and parsing content from various online comic and webtoon sources. It then presents this content within a clean, optimized web reader interface. This consolidates diverse webcomic libraries into a single application, offering features like reading progress synchronization and customizable display options, significantly enhancing the user experience for sequential art.
Vaultwarden
Vaultwarden stands as the absolute cornerstone of my digital security, serving as my personal, self-hosted password manager. My unwavering commitment to this service stems from the critical need for robust password management combined with uncompromised data sovereignty. Its clever implementation makes it powerful: Vaultwarden is a highly efficient, open-source server implementation fully compatible with the Bitwarden API, written in Rust. This enables me to connect standard Bitwarden client applications (desktop, browser extensions, mobile) to my private server, rather than the official Bitwarden cloud. All my encrypted password vault data is synchronized exclusively with my local instance, ensuring that my most sensitive credentials are stored directly on my hardware, under my complete control, delivering enterprise-grade security within my own infrastructure.
Watchtower
Watchtower is the indispensable automation engine that tirelessly keeps my entire Docker container fleet perpetually up-to-date, a critical component for maintaining system integrity and security. My rationale for its deployment is to eliminate the manual overhead of updating numerous services, ensuring I benefit from the latest features and security patches. Its automated process is key: Watchtower operates as a Docker container itself, periodically polling configured Docker registries (e.g., Docker Hub) for updated images of my running containers. Upon detecting a new image, it intelligently pulls the updated version, gracefully stops the old container, launches a new container with the refreshed image (preserving its configuration), and then cleans up obsolete images. This autonomous update mechanism is fundamental for reducing vulnerabilities, improving performance, and ensuring continuous service availability across my homelab.
5. My Security and Monitoring Considerations : My Digital Fortress
Network Security : My First Line of Defense
-
Firewall Rules on MikroTik Router: I meticulously configure strict firewall rules on my MikroTik router, restricting external access to only the necessary ports and services. This is my primary barrier against unauthorized external intrusion.
-
VLAN Segmentation: I employ extensive VLAN segmentation to isolate different service tiers and device types. For instance, my IoT devices are segregated from my critical servers, containing any potential breaches.
-
VPN Access: I utilize VPN access for secure remote administration. This ensures that when I’m managing my homelab from outside my home network, my connection is encrypted and protected.
-
Network Monitoring: I integrate containerized solutions for network monitoring, allowing me to visualize traffic patterns, identify anomalies, and detect suspicious activity in real-time.
System Security : Hardening My Foundations
-
Regular Security Updates: I maintain a rigorous schedule for applying security updates on all my systems, ensuring I’m protected against the latest vulnerabilities.
-
SSH Key-Based Authentication: I strictly enforce SSH key-based authentication and have completely disabled password authentication for all my servers. This significantly reduces the risk of brute-force attacks.
-
Fail2ban Deployment: I’ve deployed Fail2ban to automatically ban IP addresses that show malicious signs, such as too many failed login attempts, providing an active layer of intrusion prevention.
-
Container Security Scanning: I regularly scan my Docker images for vulnerabilities and use secure base images, ensuring that my containerized applications are as secure as possible.
Monitoring and Observability : My Eyes and Ears
-
Comprehensive Logging Aggregation: I aggregate logs from all my services into a central location, providing me with a holistic view of system events and making troubleshooting far more efficient.
-
Performance Monitoring: I actively monitor the performance of all my services, tracking CPU usage, memory consumption, disk I/O, and network throughput to identify bottlenecks and ensure optimal operation.
-
Network Traffic Analysis: Beyond basic monitoring, I delve into detailed network traffic analysis to understand data flows, identify potential misconfigurations, and detect unusual network behavior.
-
Automated Alerting: I’ve set up automated alerting for service failures, resource thresholds, and security events, ensuring I’m immediately notified of any critical issues that require my attention.
6. My Professional Development and Learning Outcomes
My homelab infrastructure is not just a collection of hardware and software; it’s a dynamic learning environment that directly contributes to my professional development objectives.
Technical Skills Enhancement :
-
Advanced Linux System Administration: My daily interaction with Ubuntu Server and various Linux VMs has significantly deepened my expertise in system configuration, package management, and command-line proficiency.
-
Container Orchestration and Management: Managing a fleet of Docker containers and experimenting with Kubernetes has given me invaluable hands-on experience in modern application deployment and scaling.
-
Network Design and Troubleshooting: From configuring VLANs on my MikroTik router to diagnosing connectivity issues, I’ve gained practical skills in designing robust and resilient networks.
-
Security Implementation and Monitoring: Implementing firewalls, VPNs, and intrusion prevention systems has provided me with real-world experience in securing digital environments.
-
Infrastructure as Code Practices: While still evolving, my use of
docker-composefiles is a step towards managing my infrastructure as code, a critical skill in today’s DevOps landscape.
Enterprise Technology Exposure :
-
Virtualization Technologies and Hypervisor Management: My Proxmox setup on the Mac Mini has given me direct experience with Type 1 hypervisors, mirroring enterprise virtualization environments.
-
High-Availability Service Design: By implementing RAID 1 and configuring restart policies for my containers, I’m gaining practical insights into designing services for resilience and uptime.
-
Backup and Disaster Recovery Planning: My comprehensive backup strategies for media and critical service data are a direct application of enterprise-level disaster recovery principles.
-
Performance Optimization and Capacity Planning: Monitoring my services and understanding resource utilization helps me optimize performance and plan for future growth, just like in a professional data center.
Practical Application :
-
Real-World Problem Solving: My homelab constantly presents me with production-like constraints and challenges, forcing me to solve real-world problems with practical, hands-on solutions.
-
Documentation and Change Management Practices: I strive to document my configurations and changes, understanding the importance of clear records for maintainability and collaboration.
-
Automation and Scripting: I’m continuously looking for opportunities to automate repetitive tasks, enhancing my operational efficiency through scripting.
-
Security-First Design Principles: Every architectural decision I make in my homelab is influenced by a security-first mindset, ensuring that protection is built in from the ground up.
My Homelab : A Living Testament to My Passion and Growth
For me, this lab isn’t just a stack of blinking LEDs and YAML files, it’s a hands-on playground where curiosity meets real-world tech. It’s where I’ve broken things (often), fixed them (eventually), and learned more than any textbook or tutorial could teach. Every wire, container, and config file tells a story; not just about systems and services, but about growth, experimentation, and persistence.
What started as a weekend curiosity evolved into a self-driven learning environment that sharpened my skills in system design, security, networking, and DevOps. More importantly, it taught me how to think like an engineer: to ask the right questions, balance trade-offs, and keep iterating until things just work.
This isn’t just a hobby, it’s how I learn, how I build, and how I think. My homelab isn’t a project I completed. It’s a project I live in, constantly evolving, always teaching, and never quite finished. And honestly, I wouldn’t have it any other way.